Grilled Whole Turkey**Modified from a recipe on allreceipes.com                            Jill Brothers


I have only done this using a gas grill—if you are VERY” good with maintaining temp with charcoal- go for it. The original also called for the bird to be rolled around on the grill to “sear”. I find this totally unnecessary, but you are welcome to do it if you wish.


This method leaves your entire oven available for all the other lovely dishes you are making for your feast.


Ingredients:

Whole Turkey- 12-16 pounds

4 cups chicken stock (I use the stuff in the carton)

2 cloves garlic- crushed

1 onion- chopped coarse

1 teaspoon poultry seasoning**

½ teaspoon chopped parsley

1 teaspoon paprika

**A note on seasoning- use the above or if you have access to fresh herbs coarsely chop rosemary, parsley, sage and thyme 

Start the gas grill and bring it up to 325-350 degrees. You will maintain this temp the entire time.

Prepare a large roasting pan (I use the heavy-duty tin disposable one, Smart & Final has them for .99 cents each) pour in your box of stock and add your garlic, onion, and herbs.

Remove your defrosted turkey from the package. Take out the bag of giblets and the neck- remove from bag and simmer those in 4 cups of water until the meat is coming off the neck- this can be used in your gravy.

If your turkey has a plastic bag with some liquid in it marked “gravy” remove it and throw it in the rubbish. It is nothing but a bag of brown salt water and is disgusting.

I usually rinse my turkey out with water in the sink, pat dry with paper towels and generously salt and pepper the cavity. **if you do this make certain to clean and sanitize the entire sink and counter area so you don’t cross-contaminate everything with raw poultry. **

Place your turkey BREAST SIDE DOWN in the roasting pan with the stock and herbs.

Cover tightly with a couple pieces of foil. Place the pan on the grill and go make the rest of your food. Do not peek under the foil or you are just going to let the heat out of your grill. It’s better to monitor the temperature of your grill rather than the bird. You may peek in at 2 hours just to make sure you have plenty of liquid still in your pan. Add a cup of water if its low.

The bird will cook about 3.5 hours for a 10-12-pound bird and closer to 4.5 for a 12-16 pound bird.

I usually pull the foil off the bird at about 3 hours to allow the exposed skin to brown. You want an internal temp in the thigh of 180 degrees. But here is a for sure to tell if it’s done- the leg or wing pulls right off!


Oatmeal banana cookies                                                                                            

Over-ripe bananas. I hate them. In fact, I barley like bananas let alone banana “flavored” things.

That being said, I hate food waste more, so I went in search of a recipe for ripe bananas other then banana bread. Found this cookie and its actually pretty good for a breakfast cookie with your coffee. Or “Kauw-fee” if you are from New Jersey. Heh heh

As usual, I took some liberties with the recipe.

Heat oven to 350 degrees.

Cream together:

·         3/4c salted butter (or in my case, unsalted and a pinch of kosher salt)

·         1 c brown sugar packed

·         ½ c sugar – I omitted this, the brown sugar was plenty.

·         1 egg

·         1 t vanilla

·         1 c mashed banana – about 2 small over-ripe bananas


Assemble Dry ingredients:

·         1 ½ c flour

·         1 ½ t cinnamon

·         ¼ t ground cloves (you can omit if you don’t have)

·         1 t baking soda

·         2 t cornstarch

And finally

·         3 c old fashioned oats or quick oats (just not steel cut)


Once the wet ingredients are missed, stir in the dry ingredients. I used my stand mixer but if you are doing by hand, I would hold back the oats and add them in AFTER you incorporate all the flour.

 Drop by tablespoon or doser on parchment lined baking sheet and flatten a little, they will also spread out a bit. Bake 9-12 minutes in 350 oven. Cool on a rack

The first time I make any recipe, I normally stick pretty close to the original. When I make these again, I’m going to cut the brown sugar back to ¾ cup, swap in a quarter cup applesauce for part of the butter and add chopped walnuts or golden raisins. Or both. We’ll see.


Mushroom Ravioli ala Mimi                                                                         Jill Brothers


I am teaching my granddaughter how to cook. Recently we made homemade mushroom ricotta ravioli.

And it was amazing!


Now you do NOT have to be a pasta dough expert to do this. I found a very simple and excellent recipe using your stand mixer: https://www.food.com/recipe/perfect-homemade-pasta-or-spaghetti-for-kitchenaid-mixers-288125?ic1=suggestedAsset%7Cperfect%20homemade%20pasta%20for%20kit

I have made both ravioli and fettucine with this recipe and it turned out great every time.

Start the process by making your pasta dough. The dough needs to rest at room temp at least 30 minutes so do it first.


I used Semolina flour and Double “OO” flour, not just AP flour. It is worth it to get these 2 flours but don’t NOT try it with just AP flour. Follow the directions from the recipe link. 

When your dough comes together in the mixer remove it and kneed a few times to form the nice ball. Then wrap in plastic wrap and set aside to rest.


Next I made the filling. I coarsely chopped 3 cups cremini mushrooms and sautéed with 1 minced shallot and a couple chopped cloves of garlic in olive oil. I did this low and slow string frequently so that most of the moisture came out of the mushrooms.


 Then move the mushrooms to the food processor add a cup of ricotta cheese and half cup shredded parmesan. Next buzz them up almost to a paste but not totally smooth.


Once your filling is ready set aside and start making pasta sheets. Cut a chunk off your dough ball (about ¼ of the ball), re-wrap the rest in plastic so it doesn’t dry out. Make your pasta sheets running the dough through the pasta maker starting at setting one and finishing on setting 6 or 7. I liked 7.  I have the pasta attachment for my mixer which is really cool and makes this a faster process. I also have an Atlas “old School” hand crank which still works just great but harder to do if you don’t have a helper to crank while you feed.

 Here is my granddaughter making the pasta sheets. She LOOOVES it when Nana takes pics (NOT)


Lay your sheet on a flat surface, with a second sheet to cover or plan to fold your sheet over so allow room for there to be edges and the filling won’t come out.

Drop your filling by spoonful’s or if you have a cookie press or pastry bag you can employ any of those to place your filling on the pasta sheet. Fold over or place the second sheet on top of the first sheet with the filling, gently press down around each bit of filling to seal and get the air out.

Cut the raviolis apart and move to a parchment paper lined sheet pan with a bit of corn meal spread on it so they don’t stick.


I have a neato ravioli stamp, you can use a wheel or even a cookie cutter.


Pick up the extra dough after you cut your raviolis and add to the next cut of dough from the ball. Repeat the steps until you use everything up!


These freeze great! Leave them on the sheet pan and put in the freezer overnight. Next day remove to zip bags or freezer containers. Good for a few months in the freezer. (But I bet they don’t last that long!)

To cook drop in salty boiling water, they float when they are done (a couple minutes is all!) Enjoy with your favorite sauce! And yes, a wine for me please!


Summer potato salad


Nothing says summer like a big bowl of potato salad, or at least that is summer according to Mr. Brothers!
 
I’m not big on measuring but I’ll try to quantify as best as I can for you.  
 

Potatoes – 12-14 Medium
Eggs- 6
Onion- ¾ cup (more if you like)
Celery- 3 cups (less if you like!)
Mayo – light is fine, that’s what I use - **we’ll talk about this quantity later
Yellow Mustard- 2 T
Dill relish – 2 T
White wine vinegar- 2 T
Sugar- 1t
Celery SEED- 2 t
Salt & Pepper to taste
Cajun if you’re fancy!


Boil 12-14 medium sized potatoes, I generally use russets, but I had a few Yukon golds that needed to be used so this is a combo batch! Boil until fork tender. Once the skin breaks open get them drained and spread out to cool.

Boil 6 eggs – bring to a boil, rolling for 3 minutes. Cover and turn off for 5 minutes, run under cold water to cool. Cooling the eggs down helps to prevent that ugly gray ring from forming around your yolks. It is harmless, just not so pretty. 


While the spuds are cooling, chop your celery & onion, Peel & set aside your eggs

Once your spuds are cool, gently peel the skin off the russets. This is not needed and sometimes I leave the skin on.

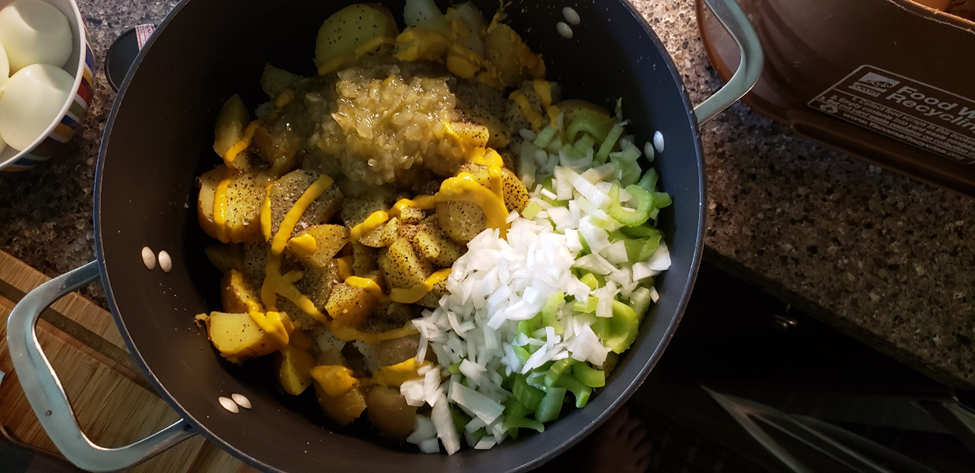
See, I left the skin ON the Yukon’s.


In a large vessel, I used my big pot I cooked the potatoes in, cut your potatoes into 1- 1.5-inch cubes

Add to the vessel: onions, celery, Mustard, vinegar/sugar, salt & pepper, relish, celery seed


Let’s talk about mayo. I think what separates my salad from many others out there is the dill relish and the minimal mayo. I use just enough to mix. Like ½ to ¾  cup for this size batch. You are welcome to add more if you like.  I like to give this a good mix and stir, Now taste it! Does it need a bit more salt? Add that now and THEN add the mayo and mix again.


It might be hard to see but this salad is a bit more yellow from the mustard vs white from mayo. Almost on the dry side! This method helps to keep the salad from “weeping”. Nothing worse than runny potato salad.

Put the salad in the serving or storing container. Using your handy egg slicer, slice the eggs and layer on the top of the salad. Sprinkle on some paprika for pretty. (I like smoked paprika myself, just sayin)


Beef Wellington is now on my resume!

 I wanted to try something new for Christmas dinner this year. Since it was just Brant and I it was ok if I botched it!


I followed Tyler Florence's Menu and recipe: 

https://www.foodnetwork.com/recipes/tyler-florence/the-ultimate-beef-wellington-recipe2-1952280

I didn't get ALL the images you might need but I have enough for you to get the idea.

I gathered all the ingredients from Tyler's menu. 

Step One: Tie your tenderloin about every 3 inches so that it holds its shape while you sear it.

In a heavy bottom skillet, sear each side-- just a couple minutes, you are not cooking it!

Duxelles is a very concentrated sautéed mushroom almost paste... chop the mushrooms finely, I used cremini and chanterelles and chopped in the food processor. They are then cooked down and finished with sherry or white wine. I only had Madera (dry) so I used that.

Fingerling potatoes with whole garlic cloves, olive oil and fresh rosemary- on parchment paper for roasting-smashed as soon as they were soft enough to do so then a bit more olive oil so they got crispy!


The missing step here is important-- spread out a piece of plastic wrap. Shingle prosciutto on the wrap and spread the duxelles on the prosciutto. Remove the string from your tenderloin. place the beef in the center of the prosciutto and roll it up using the plastic wrap. Chill in the fridge about 30 minutes. 

This image is from my friend Lori's Beef Wellington, we both made for Christmas!!


While beef is chilling, prepare your puff pastry. I used 1 and a half packets of frozen/defrosted puff pastry. Use a rolling pin to seal the seam and make a bit thinner. Remove the plastic wrap from the beef, Place in the center of the pasty and roll it up putting the seam on the bottom. 


Place pastry covered beef on your parchment lined baking sheet and coat with a beaten egg. You can see I used a star shape cookie cutter on some of the extra pastry to create the design and some extra star puffs. 


Saluted Swiss Chard with toasted walnuts and huckleberries were prepared along with a Peppercorn Ju while the wellington baked.


A 2012 Kerloo Stone Tree Cabernet Sauvignon was the wine pairing. Suez, this is Ryan Crane's juice!!


I pulled the roast at an internal temp of 127 and let it rest 30 minutes before cutting.
NAILED IT!


Plated

Now this is a more advanced recipe but its really not hard if you are prepared and follow the directions carefully. Go for it!


Frozen Treat- Stooooopid Easy!

 I feel like this one almost doesn't even need directions, just the pictures!! I saw somewhere on Facebook and have now made about 4 times.


8 cups watermelon cubes-frozen

1 teaspoon kosher salt (that's all I use for everything)

1 can sweetened condensed milk (NOT Evaporated milk, that is for pumpkin pie)

Peel seedless watermelon and cut into 1.5 inch cubed pieces. Put parchment paper on a cookie sheet and spread the pieces out on the sheet--I have an 8 cup food processor so that is how much melon I am using.

Freeze overnight. 

**Sidebar- If you don't use parchment paper, RUN to the store and buy a roll. Great in any pan going into the oven for easy clean up or non-stick. Especially great if you have old pans and your cookies never turn out. This will solve that issue!

Place frozen watermelon cubes in food processor with the "standard" blade. Add salt and can of sweetened condensed milk.

Put the lid on and process until smooth, Takes about 2 minutes. The salt is a very important component.
Pour the mixture into a freezer safe container with a tight lid.
Freeze at least a couple hours. Then Enjoy!


Seriously? 2 and a half years since I put a post on this blog???? How about a Cheese Souffle then?

Souffles have always seemed really intimidating until I watched a video of my hero Jacques Pepin make his Mother's recipe. It's a breeze! Here is Maman's Souffle! (that's French for mother, get it?)


This recipe uses a gratin dish rather than a souffle dish. The gratin baking dish is wider and flatter which allows for more surface area for crispy, cheesy goodness of the top and edges. It also uses whole eggs and not just whites made into a meringue which is why this is such an easy user friendly recipe!

Preheat your oven to 400.

Assemble your supplies and ingredients. I like to grate my cheese, measure out ingredients, do my chopping etc at this point, then you can just go for it!
Now, don't get scared but I altered this recipe: 
The recipe called for Gruyere Cheese- I used Jarlsberg Cheese - a nice nutty swiss type melty cheese. The recipe used 5 extra large eggs, I used 6 because I did not have extra large eggs. 
The recipe used Chives, I finely chopped up about a 1/2 cup of Lacinato Kale, spinach would also be nice
The recipe uses whole milk.. um eww, I used Fat Free Half & Half with no issues, I really think any milk would work.

Butter the sides and bottom of your gratin baking dish and coat the sides with grated parmesan cheese. This is just like when you bake a cake and you grease your cake pan and coat with flour, same idea.
Place your prepared baking dish on a sheet pan, a good habit to get into as you may save yourself some oven cleaning by taking this precaution against spillage!


When you are ready to go, start off by making the roux, that is melt your butter in a saucepan over medium -low heat, add your flour and whisk it in well, let it cook for about 10 or 15 seconds to cook out that flour taste. 
Next you will add your milk all at once while continuing to whisk. Keep stirring until it starts to thicken up and comes to a boil, this will only take a couple minutes, so stay with it!

Guess what? you just made a bechamel sauce base! (More on that another day!) Remove from heat, add salt & pepper and let this cool at least 10 minutes.
**Cooling the sauce allows us to proceed without tempering the eggs or scrambling them on accident!

Meanwhile...
In a separate bowl, beat your eggs well with a whisk or fork, stir in your grated cheese and your chives (or what ever green goodness you decided to use) Next stir the egg mixture into the cooled sauce and Mix well. Now pour into your prepared gratin baking dish. You can bake this immediately or set aside and bake later.

When you are ready, bake 30 - 40 minutes until the souffle is puffy and well browned on top. 


Dont be dissapointed if it falls a bit and does not remain super puffed up, it will still taste amazing. We eat it hot or cold!
Tada! Serve with a slice of tomato and a crusty hunk of warm bread- great for any meal of the day!